Categotry Archives: instructions

1

custom handlebar grips

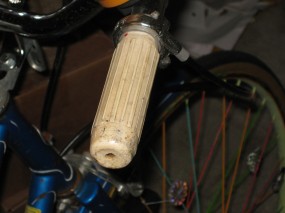
I recently got a twist shifter for my three speed. This is extremely awesome and I love shifting gears constantly now, but the vintage grip didn't quite match my newer one. Admittedly, it wasn't a huge difference, but it was bugging me and I knew I could do something fabulous.

by

First off, welcome to the new site! Since I’m no longer on WordPress’s server I don’t have to follow their rules, so expect the site to get really wild. Until then, please excuse any awkwardness!

Secondly, this Saturday I will be doing an art market at Fabric Planet, so if you’re around Venice come by!

I recently got a twist shifter for my three speed. This is extremely awesome and I love shifting gears constantly now, but the vintage grip didn’t quite match my newer one. Admittedly, it wasn’t a huge difference, but it was bugging me and I knew I could do something fabulous.

custom handlebar grips custom handlebar grips

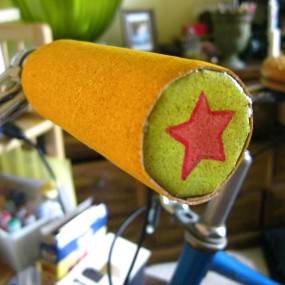
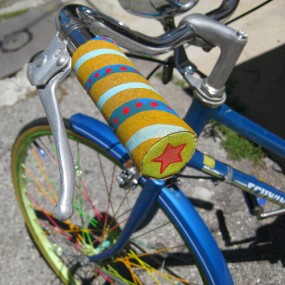
My custom grip shifter is made out of cork paper that is painted and hot glued on. For the other side I also used craft foam. All of these supplies can be easily found at a craft store.

custom handlebar grips custom handlebar grips

So you want to make your own now, right? Continue reading →

Well, the obvious first step is to remove your old grips. The easiest way to do this is to put a few drops of denatured alcohol at the opening of the grip and try to get it to drip down toward the end of the handlebar, then pull.


DIY handlebar grip

I wrapped my handlebar in craft foam so that the grip would be the same thickness as the twist shifter, and it’s really nice having that extra padding. Choose a complimentary color foam because it will show on the edge of the grip. Cut the foam to the length you want for the grip, and wide enough to wrap around the bar once or twice, depending on your preference. Glue the foam to your handlebar by applying glue a few inches at a time until you’ve completely circled the bar. Place the edge of the foam on the bottom of the handlebar.

Make sure that the end of the foam is flush with the end of the bar, and keep it tight while you’re wrapping.

custom handlebar grips
Trace the circumference of the wrapped bar onto a piece of foam and cut it out. Glue this onto the end of the bar.

You could also use a cool bottle cap if you like, but I didn’t have any on hand that I was fond of. You could actually leave it at this, with just the foam grips. It should be pretty weather and UV proof, and you could decorate it with cut-outs from contrasting foam. But this isn’t that kind of tutorial, and we’ve got to keep going.

DIY  handlebar grip cork end DIY   handlebar grip

Next it’s time for the cork. Cut out a circle from the cork paper about 1″ larger in diameter than the foam end cap. When you’re cutting the foam use a sharp blade or scissors and be careful: the cork fibers can tear apart very easily. I recommend putting an awesome design on your endcap either with acrylic paint or even Sharpies. When you’re satisfied, glue the cork end onto the foam.

You will need to cut wedges out of the cork so that the edges will lay flat when they are glued down. Cut as close to the edge of the foam as possible without tearing or leaving any gaps! I cut 10 wedges, each about 1/4″ wide at the outside end. Glue the flaps down onto the foam, going a few at a time.


custom handlebar grips

So that the outer layer of cork is smooth, you will need to add a base layer of cork. It should go from the edges of the endcap flaps to the end of the foam. Tightly wrap this around the grip and glue down.

custom handlebar grips glue cork custom handlebar grips cork wrap

Now you’re ready for the final layer of cork. I painted mine a solid color before gluing it on. You may also be able to paint any designs on it at this point, depending on what your design is (if you want a spiral you will have to wait until the cork is glued onto the handlebar so that the stripes will line up correctly). Apply a line of hot glue to the wrong (unpainted) side of the cork and attach this to the underside of the handlebar. Wrap the rest of the cork around the grip, gluing along the way, and securely glue the end.

custom handlebar grips cork wrap custom handlebar grips cork

The final step is to decorate!

custom handlebar grips cork custom handlebar grips

This post is dedicated to Meridith with the potentially awesome bike, who I just met at a bar on the beach.

4

fresh pasta

by

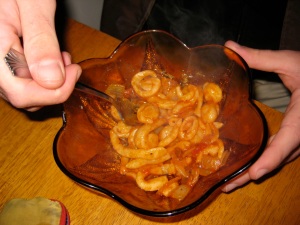
Although I normally don’t cook, every once in a while I get a craving too strong to ignore. I love the hand-rolled pasta at Il Restaurante da Piero but that place is out of my budget, which is one of many reasons I love it when my dad comes to town! So I tried my hand at making my own pasta and it was so good that I made it again the next night!

Continue reading →

I blended a few different recipes together for this pasta and I think it’s perfect. The ingredients are so basic and it doesn’t require any fancy equipment! I used my 30 year old mixer from my momma with the dough beaters, but I think you could do a great job with just your fingers. On the other hand, if you happen to have a food processor or a pasta press (or even a rolling pin, to give you an idea of how bare-bones my kitchen is) I wouldn’t think twice about using that!

Another benefit to this recipe over other pastas I’ve seen is that you don’t need any eggs.

mangia!

The pasta is incredibly filling, so one batch will happily feed two hungry diners! Expect the process to take about 30-45 minutes.

Easy Fresh Pasta

1 C semolina flour

1 C white flour

1 Tbs olive oil

3/4 C warm water

2 tsp rosemary-herb blend

dash of salt

In your nice big bowl mix together all the dry ingredients at low speed. Drizzle in the oil and water, mixing as you pour. The dough will form big chunks, and there shouldn’t be any loose flour in the bowl. Once the dough is holding together, use your dry hands to form it into a ball. The dough will be springy and your hand will leave an impression, but the dough shouldn’t be sticky at all! Knead the dough a few times, and go ahead and start boiling your water.

mixing the dough

To form the pastas, pinch of a little bit of dough and roll it between your hands. You don’t want the roll to be too thick, or else the pasta will never cook! The rolls should be about 1/4″ thick and a few inches long; they’ll look kinda like worms. We took half of our wormies and rolled them into spirals, but that’s totally optional. It can take a bit of time and some muscle to roll all your pasta, so this is a great step for everyone to help with! Involvement in the process will also make all of your diners enjoy their meal so much more.

the fun never stops when you're making pasta rolled and spiral pastas

When you’ve got all of your pasta rolled out, add it to the boiling water. The pasta will appear to clump together when you add it in the water, but just stir it up and it will separate. Fresh pasta cooks way faster than dried pasta, but since these noodles are so thick you’re still looking at about 10 minutes.

it gets a little poofy in the pot

This goes great with an olive oil sauce, maybe with some sauteed onions and mushrooms. I think pesto would be absolutely perfect, and Jason really liked it with marinara.

0

jersey dress + tutorial

by

DON’T FORGET TO VISIT MY ETSY SHOP!

This dress is so wonderfully comfortable! I can’t wait to wear it for my next long-haul roadtrip, plus since it’s lycra I won’t be worrying about wrinkles. Perfect project!

on the Santa Monica pier

Continue reading →

The story of this dress goes back to late August, on my way to Burning Man. I’d driven 2,500 miles straight through, wearing the same clothes I was in when I left New Orleans, had one shower over 4 days (and it was in a Shell station) and about 12 hours sleep over the same period of time, and as I stepped out of the sweaty port-a-potty on the side of the highway I spotted two girls across the road. They were laughing and pretty as they got out of their uncrowded Honda, and looked so cool and fresh in their jersey sundresses. They weren’t any more or less comfortable than I was in my tank top and pajama pants, but they were infinitely more stylish. I burned with envy, and sun exposure.

Months later I was in the LA Fashion District with the man I met at BM when I found some slate blue jersey in the back of a shop heaving with bolts of fabric. It was thin enough to drape perfectly but still forgiving, the color was a cool blue-grey (maybe even the color of my eyes), and the price was right at $4/yd. I let the salesman talk me into buying 2 yards and skipped out of the store, imagining how beautiful my “driving to Burning Man dress” was going to be.

in front of the carousel

I used about 1 1/2 yd of fabric for this, plus a few inches of the dark blue jersey that I happened to have around. The bodice was based on the shelf bras I’ve been making lately. I’d been planning on attaching the skirt directly to the top, maybe with an inverted V between the breasts, but Jason said it looked like a slip and suggested adding a band in contrasting fabric. Brilliant man!

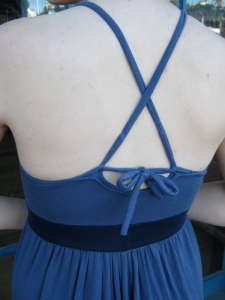
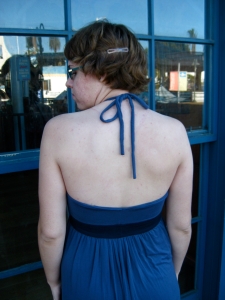
the straps crossed tied as a halter

The straps are adjustable–I can wear them tied straight, criss-crossed in the back, or tied around my neck in a halter. There are two small loops at the back for the straps to pass through. The bodice is double-layered, with the inner layer a little tighter than the outer so that there’s more support for my chest. I added about 8″ of elastic below the bust seam to keep that area snug.

Although I made this dress for summertime adventures it works great with leggings and a cardigan.

…………………………………………………………………………………………………………


Before I get to the pattern, I wanted to say a word about sewing stretch fabrics. I’d been using a 3-stitch zig zag (like on my bodysuits) but a tailor told me that a straight stitch at the longest stitch possible and zero tension would work better. Well, I don’t know about better, but it is prettier on the dress. At the beginning of the seam I backstitched to secure the stitching, and before cutting the thread at the end of the seam I pulled the fabric out and stretched it to the limit, which required several additional inches of thread to accommodate the stitching. STRETCH YOUR FABRIC BEFORE CUTTING THE THREADS AT THE END OF A SEAM!!! Trust me y’all, I’m right about this. I did all the seams for the dress the zero-tension straight-stitch way, but I still like the zig zag for bodysuits.

Here are the basic pattern pieces for this dress, in case anyone’s wondering about the construction:

NOTES ON THE PATTERN:

  • I cut all of my pieces on the fold. Make sure the fabric is facing the right way, because there is a right side on jersey!
  • The fabric is supposed to stretch over your chest, so for the bodice width subtract 2 or 3 inches from your measurements. You should cut the band even smaller to keep it from riding up over your breasts. To absolutely make sure this doesn’t happen, sew about 10″ elastic under your breasts at the top of the band.
  • Cut 2 of the bodice piece. For better support, cut the lining about 2 inches smaller and stretch it to fit the outer piece as you sew.
  • I used a heavier weight jersey for the band so that it will give some structure to the flowing shape of the dress.
  • The weight of the fabric will cause the skirt to stretch down and become longer. This is also the case for the bodice, so don’t make the neckline higher unless you want to be more modest (???).
  • There is one seam in the back of the dress.
  • The strap could be cut in the same contrasting fabric as the band.
  • I wound up handstitching the strap to the top of the dress, because I wasn’t satisfied with the evenness of machine stitching. This way, no stitching shows!
  • If you want the straps to be convertible you will need to make two small loops (about 1″ long each) and sew them on the inside of the dress so that they won’t show when worn as a halter.
  • The skirt is more gathered at the back than it is at the front, giving a slimmer silhouette.

This is all available for download as a PDF.

Plus, I’ve got lots of insight on sewing tubes to make straps, in case you’re a little lost.

DON’T FORGET TO VISIT MY ETSY SHOP!

1 2 3 4 5